What the heck is “fMRI Parrot”?
First of all, the heck is fMRI. fMRI stands for “Functional Magnetic Resonace Imaging”, as defined in Wikipedia. It involves tons of expensive hardware, like Magnetic Resonance machine, and software, used to reconstruct the scanned volumes. During fMRI scanning a series of stimulus are applied to the patient and the brain is scanned using fast scanning MRI techniques. The aim of fMRI is to record immediate changes happening in particular areas of the brain.
The single MRI scan is called “volume”. It is created from a series of slices of the predefined thickness. Having more slices creates more detailed volume and extends acquisition time. As the changes of the brain activity are momentary, a short volume acquisition interval, named TR or “Time Repetition” is needed. Usually it varies from 7 to 1.5 seconds, depending on the capabilities of the MR machine. Short TR time supposes lower quality scans, compared to the “traditional” MR scanning. So the level of detail of particular volume is a trade off between time and specific requirements.
The fMRI scans consists from a number of volumes, recorded at particular intervals. The key condition for a successful scan is the precise timing. In order to find a region with elevated activity, a stimulus must be started just when the volume acquisition begins. For this the MRI machine may expose a short pulse – start of a volume. The pulse may be brought to the MRI control room via the interface box and the required stimulus started automatically. Some stimulus require the patient to respond, eg. press the predefined button. The response from the patient is also brought to the MRI control room. As there are special requirements for any hardware at the MRI machine, only certified equipment is allowed to the MR room. The requirement at the MRI control room are more relaxed as well as the choice of the equipment There are different vendors of the interface boxes and response buttons, NordicNeuroLab (NNL) being one of them.
In order to create the simulation series, or paradigmas in fMRI terminology, a lot of time is needed. Each paradigma is to be verified before the clinical test, while some of them can not be tested without a signal form the MRI scanner or a response from the patient. There is no need to say the MRI equipment is expensive, so is the time spent in the MRI machine. Most of the MRI scanner interface boxed can be used in so called “simulation” mode, sending particular responses at the predefined moments, without actually running the scanner. For example the Sync Box from NordicNeuroLab will send “S” symbol at the start of the volume acquisition, while fORP from Cambridge Reserch Systems is to send “5”. So what is actually required to test a paradigma, is the response from the scan… WAIT!
It’s must not be the MRI scanner nor the interface box.
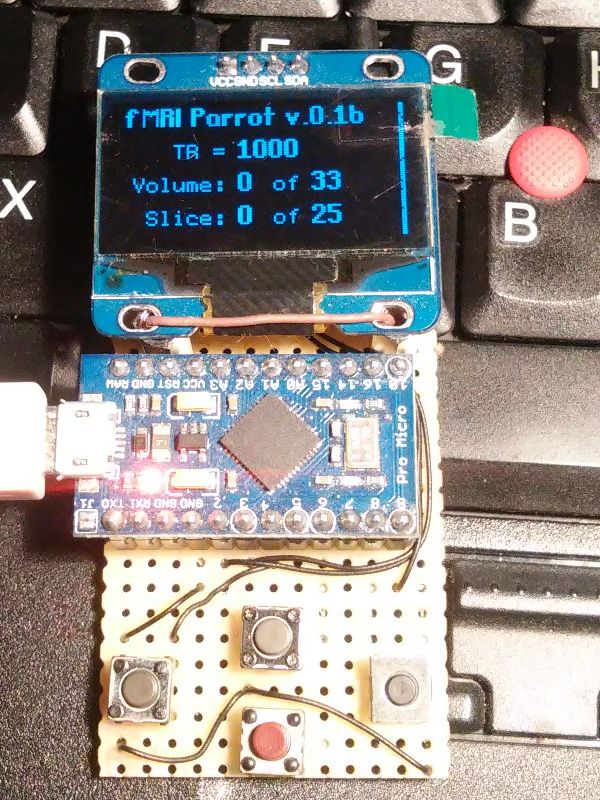
And here the fMRI Parrot comes. This is the Arduino Pro Micro based device to be attached to the computer, sending predefined responses. Remember “the machine that goes “ping'” from the Monty’s Python “The Meaning of Life”? Here it is 😉
Currently it features:
- trigger button, also used for pausing;
- small OLED screen;
- start of volume response on the serial port;
- start of slice response on the serial port;
- and 4 predefined response buttons, named K1, K2, K3 and K3, sending predefined responses via the serial port.
The choice of serial communication was intentional, as the program for paradigma presentation used in the clinical trials – nordicActiva – requires NNL SyncBox to be in serial communication mode. Some presentations are created using Cogent 2000 from the Laboratory of Neurobiology, and the interfacing software with the hardware is not so trivial.
The “fMRI Parrot” is standalone solution, powered from the USB port. As Arduino Pro Micro exposes serial port when connected to a computer, the device can be controlled and set up using the USB cable. Settings are stored in EEPROM and are recalled on power up. The customizable option are:
- TR time;
- number of volumes to acquire;
- number of slices per volume;
- triggering sync response on the start of the volume;
- sync response character on the start of the volume;
- triggering sync response on the start of the slice;
- sync response character on the start of the slice;
- response character for keys K1, K2, K3 and K3. Response keys are active only when the simulation is running
Currently it is Arduino Pro Micro based, but can be easilly ported to other Arduino/Genuino hardware.
More in details, the fMRI Parrot uses:
- Bounce2 library from Arduino / Github
- SerialCommand library from GitHub (thanks mic for the clue)
- EEPROM library
- U8glib from Google Code to interface the SSD1306 based OLED screen
- a lot of /dev/hands/left
Some settings, as seen on the Arduino’s serial console

Currently,
Sketch uses 26,312 bytes (91%) of program storage space. Maximum is 28,672 bytes.
Global variables use 705 bytes (27%) of dynamic memory, leaving 1,855 bytes for local variables. Maximum is 2,560 bytes.
And yes, it’s in the GitHub.